
This is our review of the Expol Garage Door Insulation DIY Kit. The garage door insulation kit is designed for sectional doors and easy to install.
Many new houses these days have an insulated garage space attached to the home. This means that the walls and ceiling surrounding the garage are insulated with a material such as a Rockwool, Glasswool or similar. The insulation material thermally insulates the internal garage space, and can also reduce noise transfer between inside and out. But many garages in New Zealand have metal garage doors that have no garage door insulation, resulting in both heat and sound migration. Even brand new home builds are still being constructed in New Zealand without garage door insulation, even though the walls and ceiling of the garage are fully insulated. This is a Expol Garage Door Insulation DIY Kit review.
There is no currently no requirement in New Zealand to install pre-insulated garage doors or any form of retrofit garage door insulation. So usually for cost reasons, insulated doors often don't get installed. It is very common on new spec houses to discover that the garage door is uninsulated, which usually means almost an entire wall of the garage has no insulation. This is even more of an issue today, as more and more people use their garage as an extra room of the house.
Home insulation should save the occupiers' of the home money in the long run. This saving is made through reduced heating or cooling costs, as insulation slows down the heat transfer between inside and out. So generally insulation should pay for itself with the energy savings it makes sometime during the life of the building. So retrofitting a garage door should be a good way for homeowners to save on heating costs, by keeping the garage space warmer in winter. It can also have the added benefits of keeping the garage space cooler in summer, and also reducing the sound transfer through the garage door.
The best time to install garage door insulation is when the garage door is fabricated in the factory, as they can insulate all parts of the door, including any hidden cavities in the door. Most garage door manufacturers do now provide insulated garage door options. Most insulated garage doors are of the sectional door variety. This is mainly because sectional doors tend to be the most common type of garage door that is installed in NZ, and insulation is easier to install in the rigid hinged sectional panels. Some garage door companies may retrofit or sell special insulation kits for their garage doors. Thankfully there are companies like Expol that sell DIY Garage Door insulation kits, allowing the insulation of many types of existing sectional garage door.
Installing a garage door insulation kit should be a relatively easy job. However depending on the doors design , it can take quite a long time, as it did in our case. But if you have a simple flat garage door, then you could be able to complete the job within 5 hours. 

The retrofit Garage Door insulation kit we got is produced by Expol, and consists of 8 polystyrene panels, and 8 sheets of plastic corflute sheeting. The polystyrene panels are installed first, and the corflute sheeting is installed over the top of the polystyrene panels. The corflute helps to secure the polystyrene panels in place, and protects the soft polystyrene insulation surface from damage. Also included in each kit is a tube of silicon sealant to adhere the polystyrene to the steel panels if needed. In many cases it may not be needed, but in our installation it was essential as explained below.
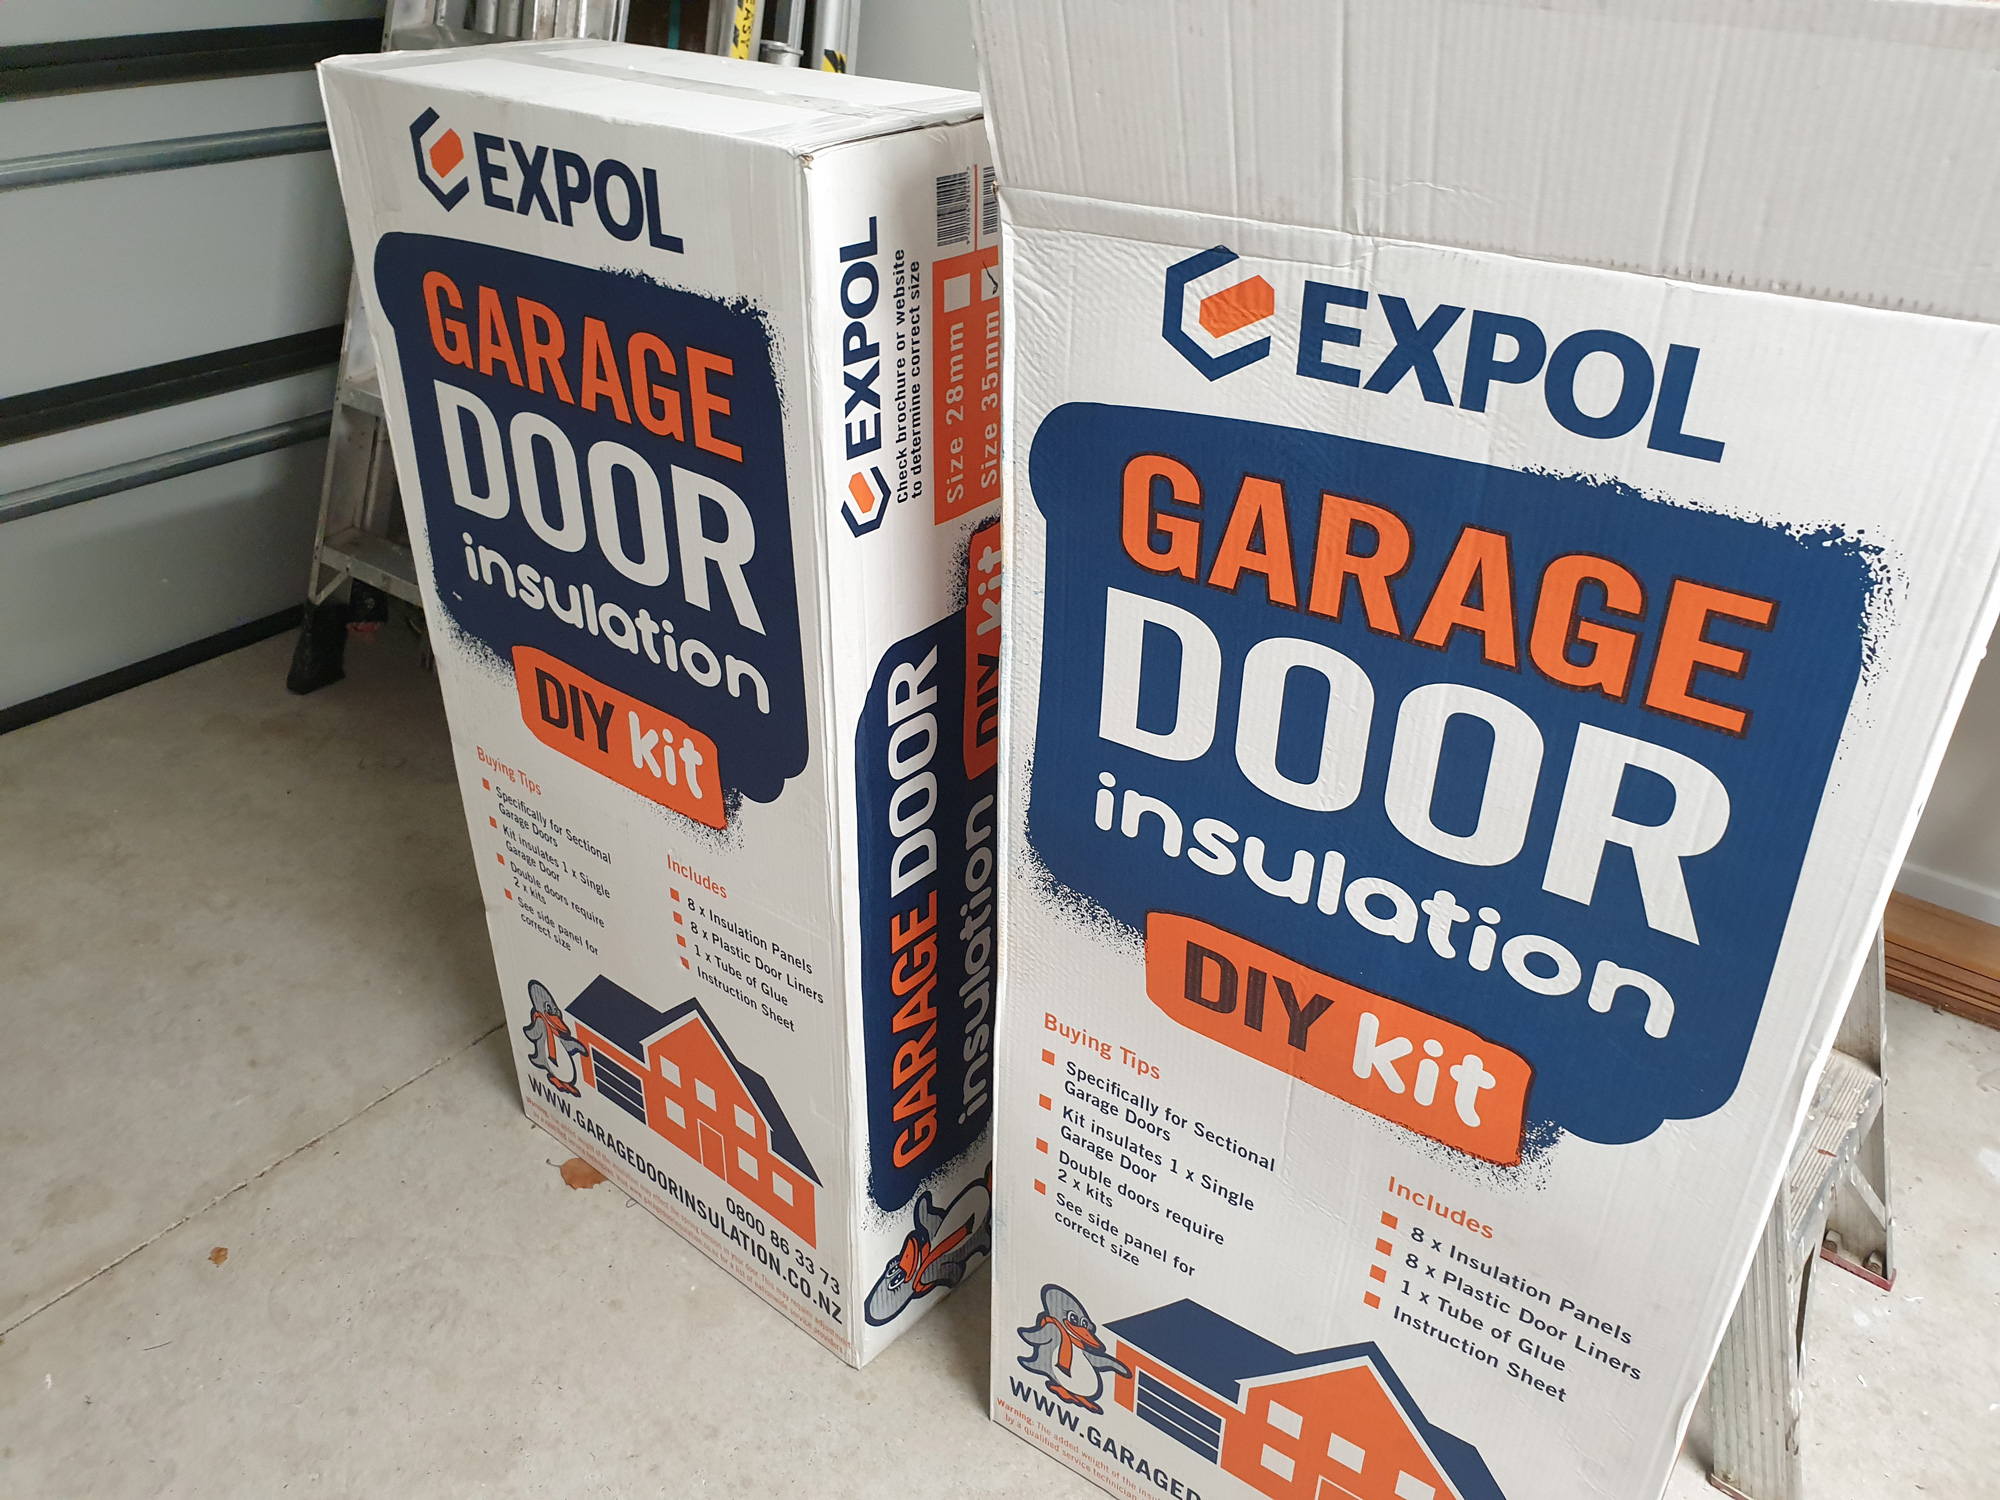
The two Expol Garage Door Insulation DIY Kits we needed for our single garage door
Two of the polystyrene panels (kit comes with 8), and 8 of the Corflute Panels

The insulation R-value of the 35mm thick polystyrene insulation in our insulation kit is less than 1. So it is quite a lot less than regular wall insulation, but the R-value is more than double that of most double glazing. Depending on the size of your garage door, you may need more than one garage door insulation kit. The garage door we are retrofitting insulation into is a single garage door. So theoretically one kit should have been enough, as the kit is supposed to be enough for a single garage door. Although our garage door is a relatively standard size of 2.6 metres wide, we discovered that the kit we got was too narrow, and it only fits a very narrow sized garage door. This meant that we had to buy a second kit, and unfortunately meant that there ended be a lot of waste material left over.
The internal side of our existing garage door prior to installation, where the garage door insulation will be installed

Buying two kits also ended up doubling the cost, so something that should have cost less than $150 for one kit, ended up costing double that, due to us needing to purchase two garage door insulation kits. We wish that the insulation company provided a range of different sizes to cater for this, or a half sized addon kit, which would save on both waste and additional cost.
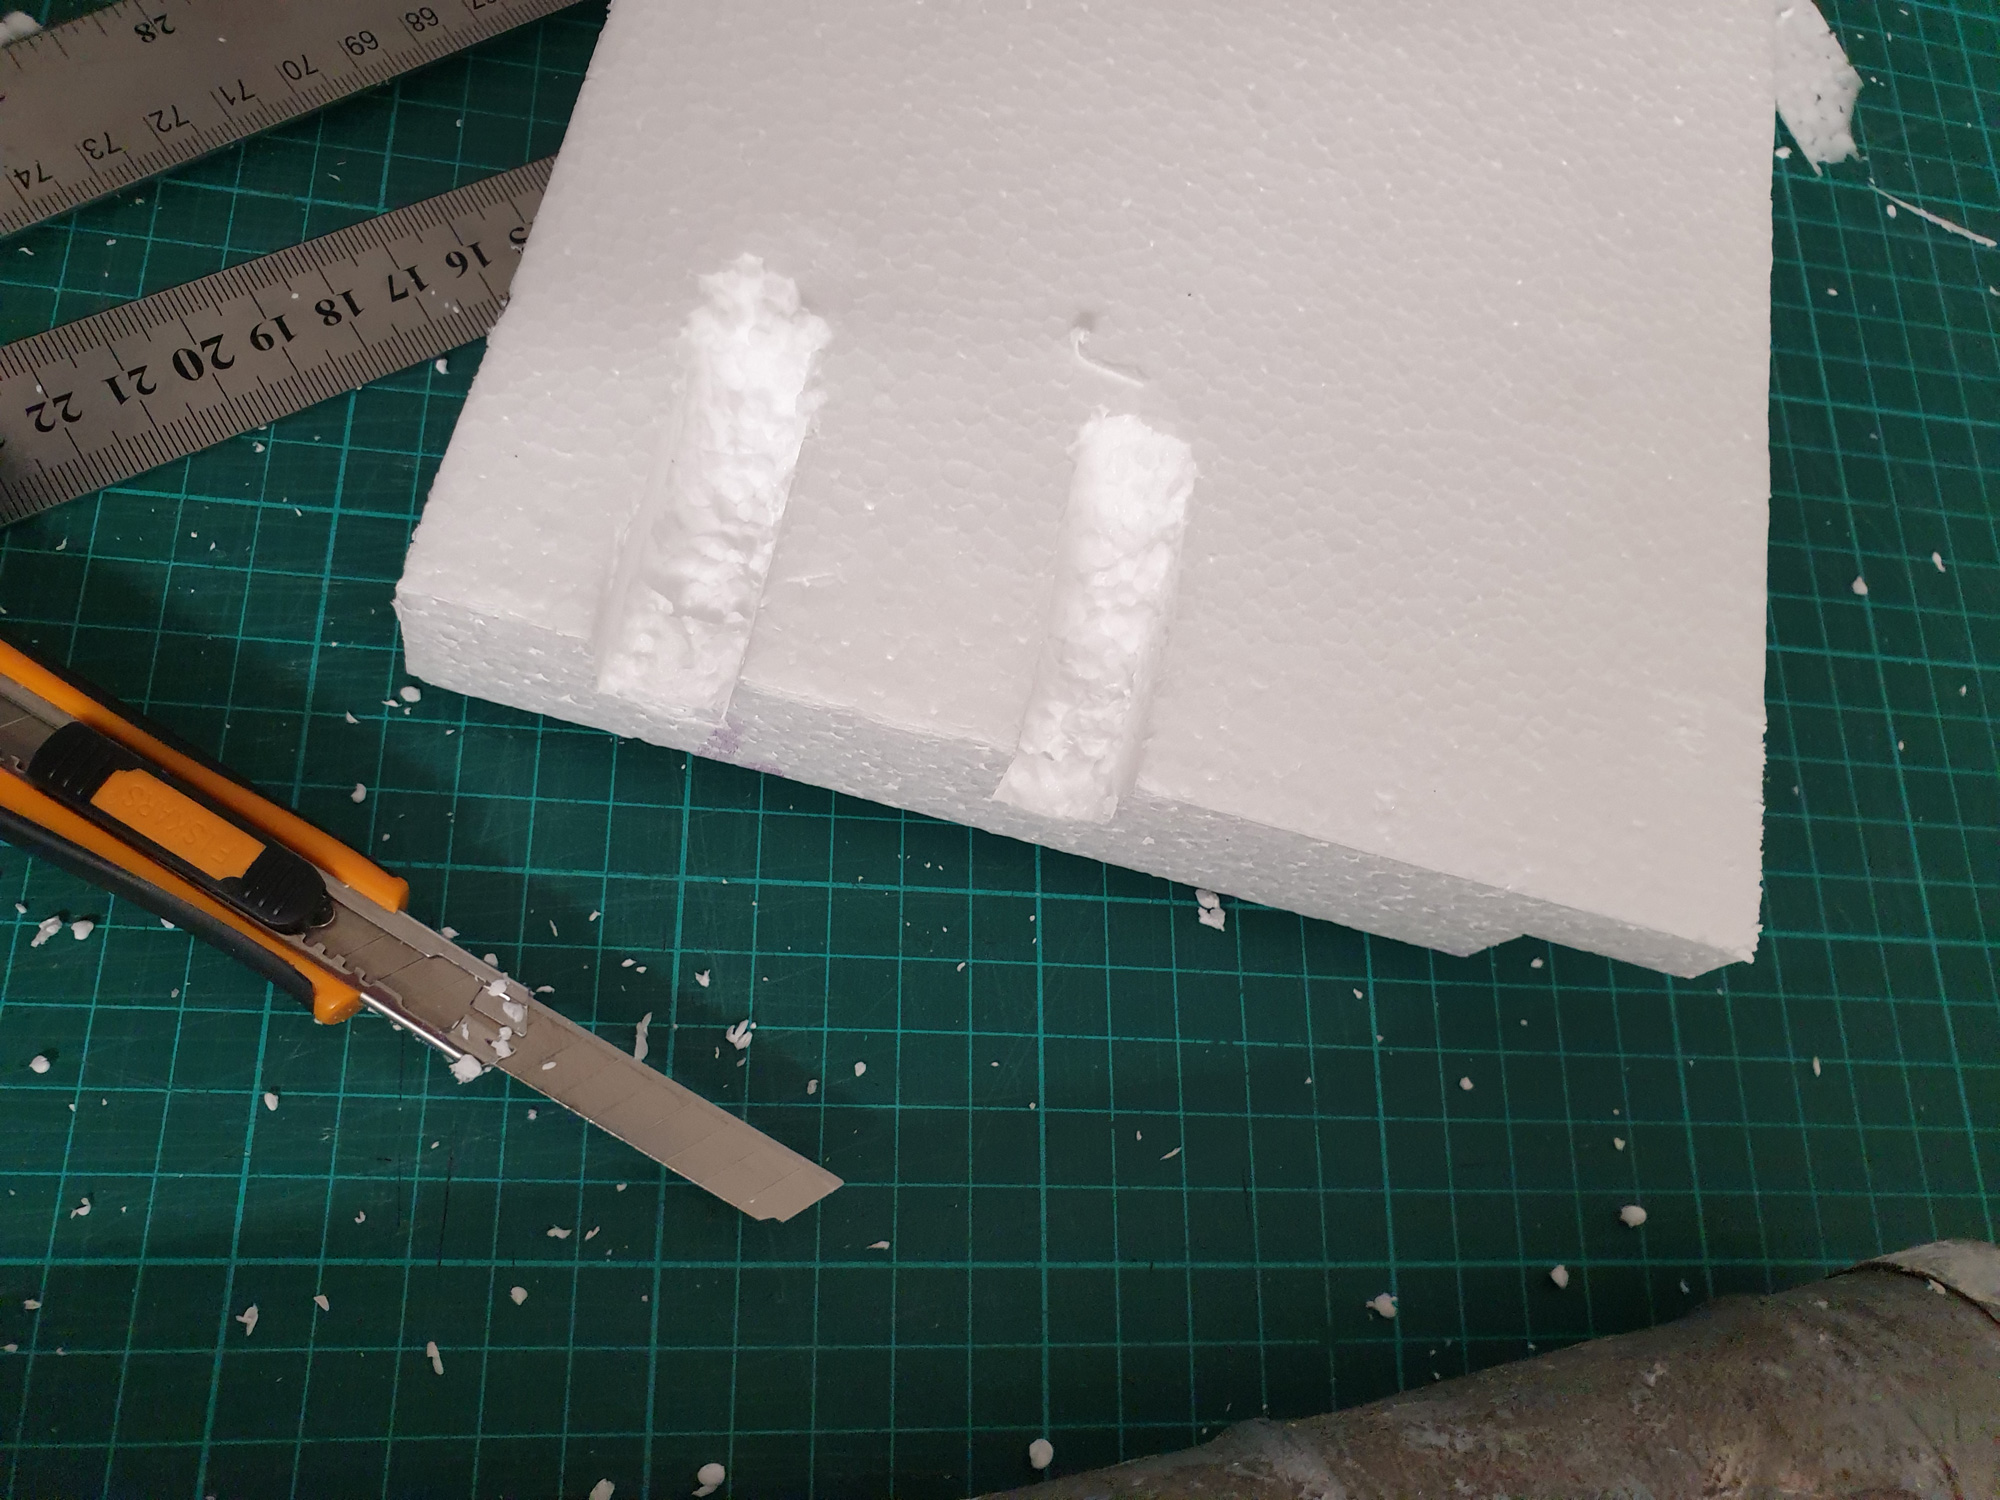
The Expol kits have two versions depending on the panel thickness of the sectional door you are installing it in. They do a 28mm (usually used for embossed door with a smaller panel depth with and R value of 0.65) and a 35mm pack (for flat panel doors with an R value of 0.85). So people need to refer to the Expol website and instructions, and measure the internal thickness of the section door panel to determine the correct thickness of kit to purchase. Our garage door was quite a lot thicker than 35mm, which meant we purchased the 35mm kits, and then had to pack out the polystyrene panels with polystyrene packers. The way we packed out the panels is shown in the images further down this page.
The major issue we had with the installation of the polystyrene panels, was that the garage door panels have long horizontal steel strengthening bars within the cavity of the steel door sections. These bars obstruct the polystyrene panels, and prevent them from being able to be slid in the door cavity, without cutting notches into the polystyrene. So this resulted in a lot of additional and fiddly work as shown in the images further down. The image below shows the horizontal steel bars within each door panel that we had to work around.
Steel horizontal strengthener bars within door panel

Packing the back of the panels with polystyrene packers to increase the thickness of the panels so they will fit better

Insulation panels have to be installed in four pieces, as the polystyrene panels come in a 1.2 metre maximum lengths. This is too narrow for the garage door segments in our door. Also the panels have to be cut around the horizontal strengthening bars.

This is a panel where the polystyrene has been notched to accommodate the horizontal strengthening bar

A few of the smaller pieces that had to be cut and notched so they could fit around the door structure

This piece had to be notched for the screw fixings in the door. All the polystyrene panels were also glued to the horizontal bar so they wouldn't move or fall out when the door moves
The door with all of the polystyrene installed. Notice the joints where each of the 8 segments of the door is made of of 4 pieces of polystyrene. The only thing remaining is the installation of the Corflute panels

Due to the polystyrene needing to be installed in four parts within each of the 8 sections of the door, it means that every part of the door surface is able insulated. So there are no uninsulated gaps. This may not have been possible if installing it in the more conventional way as shown in the instructions. But it did involved a lot more work to do it this way. However it was unavoidable due to the horizontal strengthening bars used by the manufacturer of the door to strengthen the flat panel sections. The end result however should mean that it is a better insulated door, resulting in both less heat loss and sound transfer through the door. As the door is installed next a busy road, it was already noticeably quieter in the garage.
Installing the corflute wasn't too difficult. But due to our panel segments being longer than the corflute panel, it mean that we had to join a small bit onto the end of each panel. We used some clear waterproof plastic tape, and adhered this behind the panels along the join, to secure the two parts to one another. Although these joins are visible to the left and right sides of the door, they don't look too bad.
Expol Garage Door Insulation DIY Kit Completed, with the Corflute installed.

Clean Up and Finishing
After completing tithe installation of the Expol Garage Door Insulation Kit, you will find that there will be a significant amount of mess left over from the polystyrene. It gets everywhere! Large bits we swept up, and smaller fragments were vacuumed up. Using a very sharp knife blade does help to cut down on the amount of polystyrene bits that are created.
We would suggest you contact your garage door company first before installing the Expol Garage Door Insulation Kit and they can advise you. This is what we did. You should also check that it won't void any warranties etc. The garage door company may also be able to install garage door insulation for you if you are not a DIY person. However after inspecting another garage door which had had the insulation preinstalled by a garage door company, we noticed that there were were a lot of gaps around the insulation. The gaps were both to the sides and the tops of each panel, and we could even hear quite a bit of road noise coming through the door. So the way we had installed the Expol Garage Door insulation on our garage door, there are no gaps at all. So our garage door insulation install should provide superior insulation performance and be better and reducing sound transfer.
Expol Garage Door Insulation Conclusion
We are very happy with the end result. The overall look of the the insulated door looks professional, and the white panels also help to make the garage brighter inside. It was a satisfying experience to install it ourselves, despite the fact that it took a lot longer than we thought it would, due to having to cut up and glue the polystyrene to fit around the metal bars. A garage door that didn't have these bars would be a far easier and quicker install.
A few things we would like to see improved are:
- Longer polystyrene and corflute panels, to accommodate wider garage doors with wider door segments. As the segments in our garage door were longer than the polystyrene and corflute panels, it meant we had to join the lengths of polystyrene and corflute. The corflute therefore had to be butted up alongside the other, so there is a visible join.
- Maybe selling a half pack, or the ability to buy just a few extra panels. Our single garage door was an average sized door, but we had to buy an additional pack of 8 panels, because the single pack would only do a very narrow single garage door. Normally you would only need a second pack if you were doing a double door. So we used less than 1/4 of the second pack. This has resulting in a lot of waste and it also doubled our cost.
- Having an additional colour option for the corflute panels. We found with the white corflute panels differed in colour depending on the pack, and after it was installed you can see the joins in the polystyrene behind it. Although this is only because we had to join the polystyrene panels. It may not be an issue if you aren't having to join the panels. White also may not be the best colour in a garage longer term as it will get grubby. A grey coloured corflute may help eliminate these issues, and the corflute used on professionally installed garage door insulation does tend to be grey in colour.
We are glad that there are companies like Expol that have put together these Expol Garage Door Insulation kits. We would certainly recommend insulating your garage with this type of kit. We are yet to notice much thermal difference, but we instantly noticed the reduced noise transfer through the door.
We think it should be a requirement in New Zealand for all garages and garage doors in residential dwellings to be insulated. One reason for this is that due to the housing crisis in New Zealand, there are currently people living and sleeping in garages, many of which will be completely uninsulated, making them cold and unhealthy places to sleep. Requiring all parts of a garage to be insulated ensures that should the garage space of any dwelling ever be used as a form of emergency housing, that the garage space is actually fit for human occupation. No one ever knows when a garage may end up being used as a bedroom.
Please note that this is not a sponsored post or sponsored review. We purchased and and installed these insulation kits ourselves.


COMMENTS